Sunday, March 7, 2010
Congratulations, You Did It! Stat Tutorial
Thursday, March 4, 2010
Wednesday, March 3, 2010
Shadow Stat/Tag Tutorial-saving/using brushes
SHADOW STAT/TAG TUTORIAL
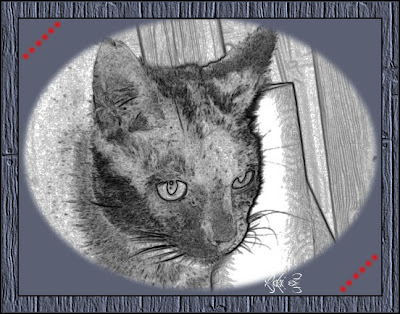
Supplies:
Download and unzip supplies file from
http://www.4shared.com/file/231692556/31745ebd/Supplies_for_Shadow_Tutorial.html
Included in this file is:
Shadow~DPZ22610.pspimage, tubed by Debi Z Designs (cat mist file)
Rake Hard.jpg by unknown (you will import as a custom brush file with instructions below)
Countryback 71.bmp by unknown (textures file)
Getting Started:
This is an intermediate level tutorial and assumes you have a working knowledge of PSP. All settings remain the same as last used unless otherwise stated.
PSP 9 was used to create this tutorial, but any higher versions should work.
If a setting is indicated and not available in your version of PSP, it is OK. Your version has allowances.
If a setting is indicated and you have more options available, change only those indicated in this lesson.
Place countryback 71.bmp into your PSP Textures file.
Open PSP
Method for Tag/Stat Header:
Step 1:
Open Rake Hard.jpg
File>Export>Custom Brush:
(note: this will save Rake Hard as a PSP Brush file)
Name Rake Hard, Check Save Variance, Step 32, complete author, copyright and descriptions if known
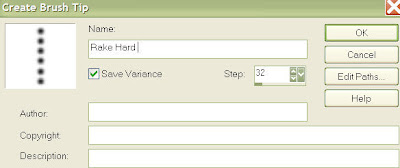
OK. We will apply it in a few steps.
Step 2:
Open Shadow~DPZ22610.pspimage
Copy mist layer and Paste As New Image
Close original without saving
Step 3:
Set FG color to red, HTML #ff0000
Set BG color to blue, HTML #5b6173
Step 4:
Layers>New Raster Layer:
Blend mode normal, Opacity 100, Link set 0, UNcheck Highlight in layer palette, Check Layer is visible, UNcheck Lock transparency
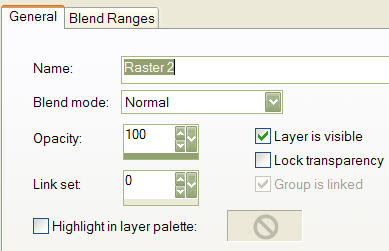
OK
Flood Fill Tool: RGB Value, 20, UNcheck Sample merged, Normal, 100

Right click on image to apply BG color
Layers>Arrange>Send to Bottom
Step 5:
Layers>New Raster Layer with same settings last used
Paint Brush Tool (looks like an art brush): from the dropdown list, choose Rake Hard
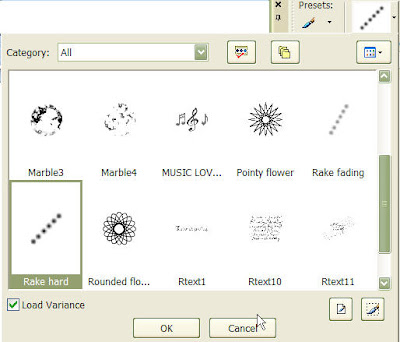
With the additional settings of 75, 10, 100, 45, 100, Normal, UNcheck Contiguous, UNcheck Wet look paint

Left click in left upper corner and right lower corner to apply red, diagonal dots (see sample for placement)
Layers>Merge>Merge All (Flatten)
Step 6:
Image>Add Borders: 2, Black, Check Symmetric
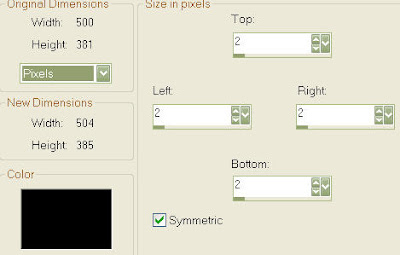
OK
Image>Add Borders: 22, with BG color and no other changes
Selections>Select All
Selections>Modify>Contract: 22
Selections>Invert
Effects>Texture Effects>Texture: countryback 71, 100, 2, 2, 0, 0, white, 60, 65, 20
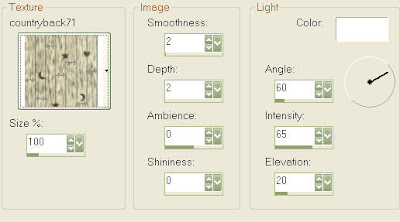
OK
Selections>Select None
Image>Add Borders: 2, Black with no other changes
Step 7:
Layers>New Raster Layer with same settings last used
Add your Watermark
Layers>Merge>Merge All (Flatten)
Step 8:
Stat makers: If making a tag, duplicate image, and follow directions below for taggers. Header image: resize to desired header size, jpeg and save. Assemble in Letter Creator using Stat Background of your choosing.
Taggers: Resize to desired tag size. Add text as desired. Jpeg and save.
This tutorial was written and designed by Debi Z from teaching and tips gained from learning groups and the web. Any resemblance to other tutorials available is coincidental. Please do not place this tut on any web site without my written permission: debzoe@charter.net. You may share this tutorial, but please give me credit in your stat and/or tag and do not claim it as your own. I would love to see any creations you make from this tut. Please share!
I hope you had fun!
Hugs,
Debi Z
Date Written: February 26, 2010
Link back to my groups required:

Thursday, February 25, 2010
Kiss Me! I'm Irish ! Stat Tutorial
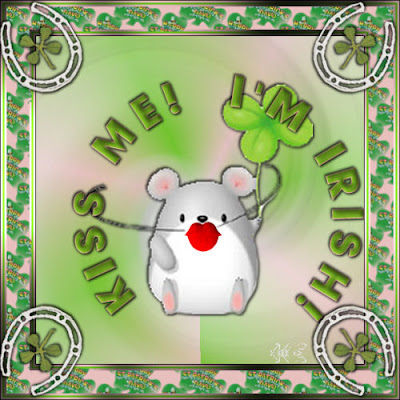
Supplies:
Download and unzip supplies file from
http://www.4shared.com/file/225620061/67ca8721/Kiss_Me_Im_Irish_Supplies.html
Included in this file is:
12.psp (Mouse), unknown artist/tuber from group shares
Lips2305b.PspShape, unknown artist/tuber from group shares
LuckyHorseshoe.pspimage, artist unknown, tubed by Debi Z Designs
St._Patty.psp, (sheet) artist unknown, tubed by JosDZigns
Irish Participants.ttf
Gregs II Plugin
Simple Plugin
Getting Started:
This is an intermediate level tutorial and assumes you have a working knowledge of PSP. All settings remain the same as last used unless otherwise stated.
PSP 9 was used to create this tutorial, but any higher versions should work.
If a setting is indicated and not available in your version of PSP, it is OK. Your version has allowances.
If a setting is indicated and you have more options available, change only those indicated in this lesson.
Install Lips2305b into Preset Shapes folder.
Open Irish Participants font and minimize to desktop.
Install both the Gregs II and Simple folders into your Plugins folder.
Open PSP.
Method for Tag/Stat Header:
Step 1:
Open 12.psp (mouse image).
Right click on the Header>Copy
Dropper Tool: choose light color from mouse image and set FG (I used #e7bfdb) and med/dk color for BG (I used #6dc227).
Step 2:
File>New: 500x500 pixels, raster, transparent:
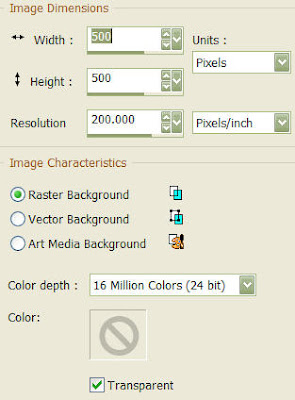
OK
This is the working copy.
Selections>Select all
Working copy: Right click on the Header>Paste>Paste Into Selection
Selections>Select None
Step 3:
Effects>Image Effects>Seamless Tile: check curved arrow for default settings: corner, bidirectional, 0, 0, 50, Linear:
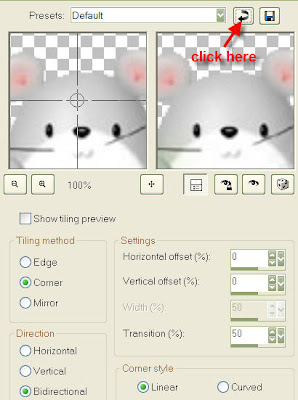
OK
Step 4:
Adjust>Blur>Radial Blur: Twirl, 80, 50, check Elliptical, 0, 0, 10

OK
Layers>New Raster: Normal, 100, 0, UNcheck Highlight, Check Layer is visible, UNcheck Lock Transparency:
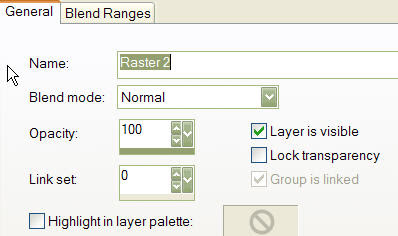
OK
Step 5:
Materials Palette>Change FG color to gradient: Foreground-Background from drop down list, angle 180, repeats 6, UNcheck Invert, Radial,
H50, V50:
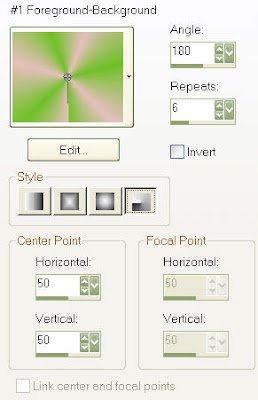
OK
Flood Fill with Gradient: RGB Value, 20, UNcheck Sample merged, Normal, 100:

Layers>Arrange>Send to Bottom
***Note: If you are not creating a stat, you do not need to do the duplicating or minimizing listed next. You can skip to Step 6.
Shift + D to duplicate to use later in stat BG. Minimize copy.
Step 6:
Right click on the Header>Paste as new layer (Mouse image should still be on clipboard, if not copy again)
Close mouse image without saving
Layers>Arrange>Bring to top
Image>Resize: 200%, check Resample using Smart Size, check Lock aspect ratio, UNcheck Resize all layers:
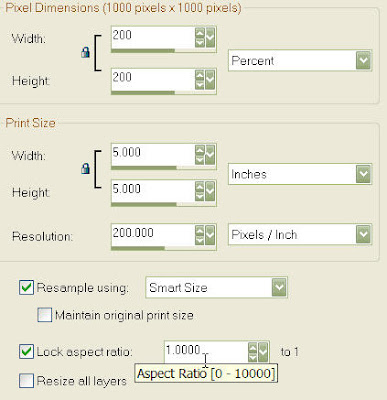
OK
Step 7:
Effects>3D Effects>Drop Shadow: 2, 2, 85, 5, Black, UNcheck Shadow on new layer:
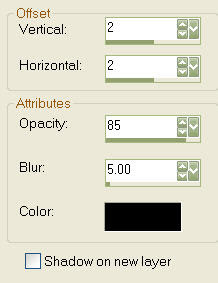
OK
Repeat Drop Shadow with V & H at -2 setting.
Step 8:
Preset Shape: choose lips2305b from drop-down list, UNcheck Retain style, check Create as vector, check Anti-alias, solid Line Style, Width 2, Miter limit 10:

Materials Palette>Change gradient back to color
Change FG & BG color to red (#ff0000):
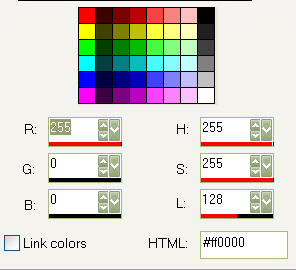
OK
To put lips on mouse, start by aligning crosshairs at left shamrock stem,
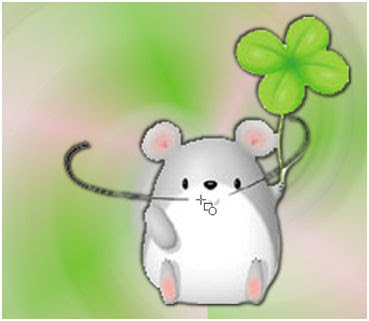
then Left click, hold and drag until you have desired sized lips with a cute pucker. Use vector nodes to adjust position &/or size as needed (see sample placement)
Layers>Convert to Raster Layer
Effects>Texture Effects>Texture: Paper coarse from drop-down list, 25, 11, 8, 0, 0, red, 315, 50, 30
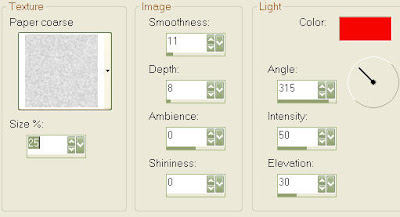
OK
Effects>3D Effects>Inner Bevel: 2, 20 15, 3, 0, 20, original FG color #e7bfdb, 225, 50, 30
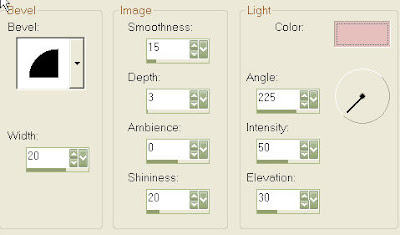
OK
Layers>Merge>Merge All (flatten)
Step 9:
Preset Tool: Change lips to Ellipse in drop-down list with no other changes in settings
Materials Palette: Null BG color:
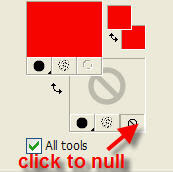
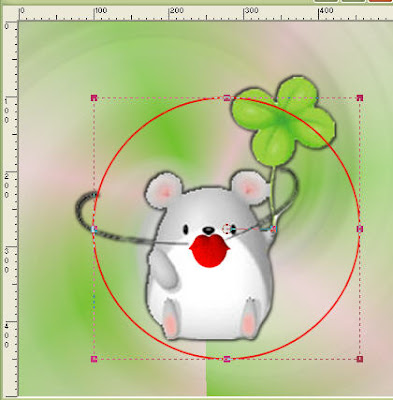
Using ruler guide (View>Rulers), start ellipse at 100 H & V by left clicking and dragging to 450 H & V before releasing:
Text Tool: Vector, Irish Participants, 36 (note: text size can be adjusted as desired), 1, Bold, Centered, Line style Solid, Miter limit 1, UNcheck Warp text, Offset 0
Leading 0, Check Auto kern, Kerning 135, Tracking 0

Materials Palette>Uncheck Null button
Change both the FG & BG colors back to original colors
Place mouse cursor over the curved line until the “Smile” appears below the A toward the top of the ellipse (see sample)
Click to place text.
Type in “KISS ME! I’M IRISH!”
Objects>Align>Center in Canvas
Layers Palette>Click + box before Vector 1.
This will open a dialogue of what is on the layer. The top one is “Kiss me…..”and the bottom one is Ellipse.
We need to turn off the line layer, so click on the Eye or Eyeglasses symbol beside the Ellipse layer. A red X or null symbol will appear over the eye/eyeglasses symbol. The line will disappear in your image.
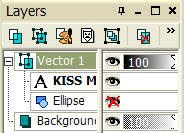
Layers>Convert to Raster layer
Effects>3D Effects>Inner Bevel: same settings as last used
Repeat Step 7 Drop Shadows, both 2 and -2, with no other changes to settings
Step 10:
Image>Add Border: pixels, black, 1, check Symmetric
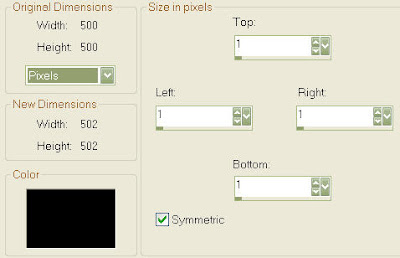
Image>Add Border: pixels, FG, 3, check Symmetric
Repeat with BG color change
Repeat again with FG
Selections>Select All
Selections>Modify>Contract: 9
Selections>Invert
Effects>Plugins>Greg’s Factory Output Vol. II>Pool Shadow: 50, 50, 50, 50, 50, 50, 128, 128
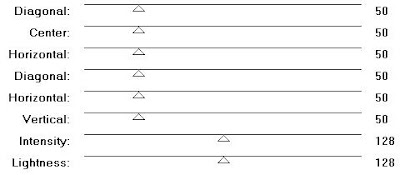
Selections>Select None
Selections>Select All
Image>Add Border: change size to 35 with no other changes
Selections>Invert
Open St._Patty. Highlight Clovers layer.
Freehand Select Tool (lasso): Point to Point, Add(Shift), Feather 0, Smoothing 0, Check Anti-alias

Click around desired clover. Right click the Header>Copy
Close St. Patty without saving
Right click in blank area of work space>Paste as New Image
Effects>Image Effects>Seamless Tiling: default settings as before
Materials Palette>Change FG color to pattern and choose seamless tiled clover image: 0, 43
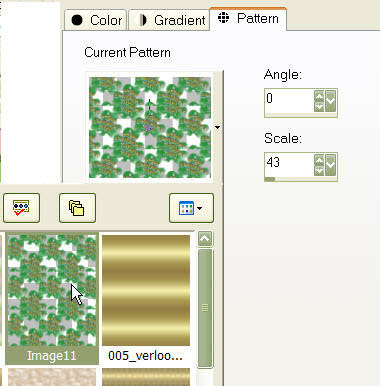
Flood Fill Tool>Click in border with clover pattern
Selections>Select None
Close clover Happy St. Patrick’s Day without changing.
Image>Add Border: pixels, FG, 3, check Symmetric
Repeat with BG color change
Repeat again with FG
Selections>Select All
Selections>Modify>Contract: 9
Selections>Invert
Effects>Plugins>Greg’s Factory Output
Vol. II>Pool Shadow: with same settings as before
Selections>Select None
Image>Add Border: change color to black and size to 1
Step 11:
Open Lucky Horseshoe>Highlight tube layer>Right click the Header> Copy
Close without saving
Working image>Right click the Header>Paste as New Layer
Image>Resize: changing W & H to 55%, no other changes from last used
Image>Rotate>Free Rotate: left, 30, UNcheck All Layers, UNcheck Rotate single layer around canvas center
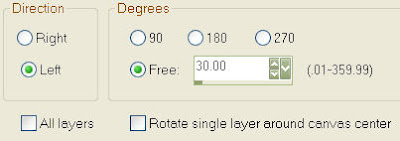
Repeat Step 7 Drop Shadows, both 2 and -2, with no other changes to settings
Mover Tool: position left upper corner (see sample placement)
Effects>Plugins>Simple: Top Left Mirror
OK
Step 12:
Layers>New Raster Layer: same settings as before
Picture Tube Tool: Apply Watermark
Step 13:
Layers>Merge>Merge All (flatten)
Image>Resize to desired tag/header size (I used 500 x 500 pixels), Resize all layers checked
File>Export>Jpeg Optimizer: compression value 20
Name and Save file.
***Note: If you are only making a tag, you have completed this tutorial. For those making a stat, continue with steps below:
Step 14:
Restore previously minimized BG from Step 5.
Layers>Merge>Merge All (flatten)
Image>Resize: 200 x 200 pixels, with no other changes necessary, with Resize all layers checked
Image>Effects>Image Effects>Seamless Tiling: default settings. OK
File>Export>Jpeg Optimizer: compression value 20
Name and Save file.
Step 15:
Take both Header and BG files and assemble stat in Letter Creator.
This tutorial was written and designed by Debi Z from teaching and tips gained from learning groups and the web. Any resemblance to other tutorials available is coincidental. Please do not place this tut on any web site without my written permission: debzoe@charter.net. You may share this tutorial, but please give me credit in your stat and/or tag and do not claim it as your own. I would love to see any creations you make from this tut.
I hope you have had fun!
Hugs,
Debi Z
Date Written: February 19, 2010
Link back to my groups required:
 http://debizdesigns.blogspot.com/