Let the Good Times Role Stat Tutorial
Supplies:
Download zip file from http://www.4shared.com/file/193866515/c4fb9ad1/Supplies_for_Laissez_Les_Bon_T.htmlez_Les_Bon_T.htmls_Bon_T.html_Bon_T.htmls_Bon_T.html
Download zip file from http://www.4shared.com/file/193866515/c4fb9ad1/Supplies_for_Laissez_Les_Bon_T.htmlez_Les_Bon_T.htmls_Bon_T.html_Bon_T.htmls_Bon_T.html
PSP 9 was used to create this test, but
any higher versions should work.
Tube: Colors_By_Lory.psp
Tube: cc_Mardi_Gras_Banner_9-03-06.psp
Tube: MardiGrasMask~DebiZ.pspimage
Font: Birthday
Getting Started:
This is an intermediate level tutorial
and assumes you have a working knowledge
of PSP.
All settings remain the same as last used unless otherwise noted.
If a setting is indicated and not available in your version of PSP, it is OK. Your version has allowances for this.
If a setting is indicated and you have more options available, change only those indicated in the lesson.
Open PSP.
Open Tubes.
Choose green with your Dropper Tool from the Mardi Gras Mask tube and set as your FG color. Set your BG color as Purple. A third color, Gold HTML #f0b13f will also be used later in the tut.
Open Font to your desktop and minimize.
See Footer for credits.
**Did you know that Purple, Green, and Gold are the official Mardi Gras colors? If you would like to read a bit on Mardi Gras traditions, check out http://www.novareinna.com/festive/mardi.html I just happened across this site, but it is very informative and fun.
Method for Stat Header:
Step 1:
File>New image: 400, 400, 300, Raster, Transparent
Step 1:
File>New image: 400, 400, 300, Raster, Transparent
OK.
In Material Palette, change FG from color to FG/BG gradient: 45, 5, invert, radial, 50, 50
In Material Palette, change FG from color to FG/BG gradient: 45, 5, invert, radial, 50, 50
OK.
Step 2:
Restore Mardi Gras Mask~DPZ.pspimage.
Shift D to duplicate image.
Close original.
In Layers Palette, delete Watermark layer.
Back to working copy: Layers>New Raster Layer
Flood Fill with BG color.
Layers>New Mask Layer: Image of Mardi Gras Mask, Source luminance checked, Invert mask data UNchecked
OK.
Layers>Merge>Merge Group
Image>Mirror
Shift D to duplicate image. Minimize copy for now. We will use it later to create stat BG pattern.
Step 3:
Restore Colors_By_Lory (lady image).
In Layers Palette, highlight Raster 1.
Edit>Copy
Close original
Back to working copy: Edit>Paste As New Layer
Image>Resize : 68 Percent, check Resample Using Pixel Resize, check Lock aspect ratio, and UNcheck Resize all layers
OK.
Use Mover Tool to reposition to right side.
Effects>Artistic Effects>Enamel: 85, 81, 124, 265, Gold HTML #f0b13
Use Mover Tool to reposition to right side.
Effects>Artistic Effects>Enamel: 85, 81, 124, 265, Gold HTML #f0b13
OK.
Step 4:
Edit>Paste>Paste as new layer (the girl should still be on your clipboard. If not, just recopy and paste)
Image>Resize>OK.
Image>Mirror
Mover Tool to position on left side
Effects>3D Effects>Drop Shadow: 4, 4, 60, 7, Black, Uncheck Shadow on new layer
Step 4:
Edit>Paste>Paste as new layer (the girl should still be on your clipboard. If not, just recopy and paste)
Image>Resize>OK.
Image>Mirror
Mover Tool to position on left side
Effects>3D Effects>Drop Shadow: 4, 4, 60, 7, Black, Uncheck Shadow on new layer
OK.
Step 5:
Image>Add Borders: Pixels, 1, Symmetric, Black (Click Ok if Auto Actions to flatten into a single background layer, if it comes up)
Image>Add Borders: Pixels, 1, Symmetric, Black (Click Ok if Auto Actions to flatten into a single background layer, if it comes up)
OK.
Selections>Select All
Selections>Float
Effects>3D Effects>Cutout: 0, 0, 50, 60, FG, and UNcheck Fill interior with color
Selections>Select All
Selections>Float
Effects>3D Effects>Cutout: 0, 0, 50, 60, FG, and UNcheck Fill interior with color
OK.
Selections>Select None
Step 6:
Image>Add Borders: change size to 20 and color to Gold HTML#f0b13f
Magic Wand in border: Mode: Add (Shift), Match mode: RGB Value, Tolerance 0, UNcheck Sample merged, Check Contiguous, Feather 0, Check Anti-alias, Outside
Selections>Select None
Step 6:
Image>Add Borders: change size to 20 and color to Gold HTML#f0b13f
Magic Wand in border: Mode: Add (Shift), Match mode: RGB Value, Tolerance 0, UNcheck Sample merged, Check Contiguous, Feather 0, Check Anti-alias, Outside

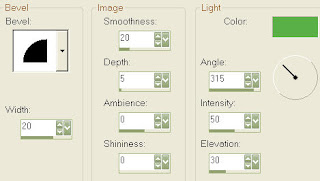
Effects>3D Effects>Inner Bevel: 2, 20, 20, 5, 0, 0, FG color, 315, 50, 30

OK.
Select none.
Select none.
Image>Add Borders : change size to 1, Black color
Image>Add Borders: change size to 45, BG color
Magic Wand in large outside border.
Change FG gradient to Pattern.
Choose transparent BG Mask pattern – angle 0, scale 120
Image>Add Borders: change size to 45, BG color
Magic Wand in large outside border.
Change FG gradient to Pattern.
Choose transparent BG Mask pattern – angle 0, scale 120
OK.
Effects>3D Effects>Inner Bevel: change color to Gold
Selections>Select None
Image>Add Borders: change size to 1, color to Purple
Step 7:
Restore cc_Mardi_Gras_Banner_9-03-06.psp
In Layers Palette, highlight Layer 1.
Edit>Copy
Close original.
To girl image: Edit>Paste as new layer
Image>Resize 90%
Mover Tool to reposition to bottom (see my example for placement)
Effects>3D Effects>Drop Shadow
Step 8:
Layers>New Raster Layer
Change FG from Pattern to Color
Text Tool: Vector, Birthday, 14, Stroke 1, Bold, Centered, Smooth, Check Auto kern, Kerning 135, Line Style Solid
Type “Happy Mardi Gras” and apply.
Layers>Convert to raster layer
Layers>Duplicate 3 times to make text darker.
In Layers Palette, turn off Raster 1 and Background
Layers>Merge>Merge Visible
Effects>3D Effects>Inner Bevel
Effects>3D Effects>Drop Shadow
Turn on all layers.
Mover Tool to position text on banner
Step 9:
Text Tool and type text in 3 lines by typing “Laissez Les” and apply
Text Tool and type 2nd line with “Bon Temps” and apply
Text Tool and type 3rd line with “Roule!” and apply.
Convert to Raster Layer
Layers>Duplicate X 3
In Layer Palette, turn off Background, Raster 1, and Merged layers
Layers>Merge>Merge Visible
Effects> 3D Effects> Inner Bevel: change to BG color
Effects>3D Effects> Drop Shadow
Turn on all layers.
Image>Rotate>Free Rotate: right, 30
Mover Tool to position text as desired
Layers>New Raster Layer
Add your Watermark
Layers>Merge>Merge All (Flatten)
Resize to your desired stat header or tag size. I like large, so I left mine at 536W X 536 H.
File>Export using JPEG optimizer and give it a name for you to save it in your folder.
Step 10:
***…And you thought we were through!! If you are making only a tag, you are, but if you are making a stat, continue with this step to create a BG for your stat.
Remember waaaaay back in Step 2, I had you minimize a copy of the image that we were going to use as a stat BG? Well, restore it now.
Layers>Merge>Merge Visible
Image>Resize: 200 x 200 pixels, all layers
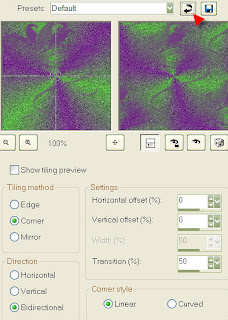
Effects>Image Effects>Seamless Tiling: default settings (click curved arrow by Presets)

OK.
In Layers Palette, decrease opacity to 50.
File>Export>JPEG Optimizer and give name as your file name stat BG.
Now you can take your saved Header and Stat BG to use in Letter Creator to assemble your stationery.
That’s it! I hope you enjoyed my tut and I also hope that you do, indeed, “Let the Good Times Roll”.
This tutorial was written and designed by Debi Z from teaching and tips gained from learning groups and the web. Any resemblance to other tutorials available is coincidental. Please do not place this tut on any web site without my written permission: debzoe@charter.net. You may share this tutorial, but please do not claim it as your own and give me credit in your stat and/or tag. Please send any creations made from this tut to me because I would love to see your creation.
Hugs,
Debi Z
Date Written: 01/10/10
Link back to http://debizdesigns.blogspot.com/ required

Graphics:
Colors_By_Lory - Tubed by Lory
cc_Mardi_Gras_Banner_9-03-06 – Tubed by Cali a.k.a. Delleena 2006 (no website available)
Mardi Gras Mask~DPZ tubed by Debi Z Designs
Colors_By_Lory - Tubed by Lory
cc_Mardi_Gras_Banner_9-03-06 – Tubed by Cali a.k.a. Delleena 2006 (no website available)
Mardi Gras Mask~DPZ tubed by Debi Z Designs


No comments:
Post a Comment