Thursday, January 28, 2010
Saturday, January 23, 2010
Friday, January 22, 2010
Smokin' Love Tag
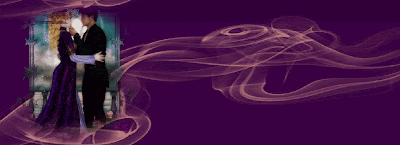 Here's another sideborder IM. Let me know if you would like the full version stat.
Hugs,
Debi Z
Thursday, January 21, 2010
CONGRATS! TUTORIAL
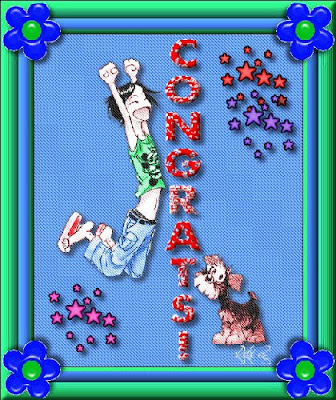 Supplies:
Download and unzip supplies file from http://www.4shared.com/file/200697484/7430d78e/Supplies_Congrats_Tut.html
Included in this file are:
Penta Plugin
!LJ[Flower Accents1].png
2 Peas Class Act Font
AB-12-15-04-Starcluster.psp
TGIFJumpGirlAndDog.pspimage
Getting Started:
This is a beginner-intermediate level tutorial and assumes you have a working knowledge of PSP.
All settings remain the same as last used unless otherwise noted.
If a setting is indicated and not available in your version of PSP, it is OK. Your version has allowances.
If a setting is indicated and you have more options available, change only those indicated in this lesson.
Install the Penta folder into your plugins folder before you open PSP.
Open PSP. Version 9 was used for this tutorial, but your version should work well.
File>Preferences>File Locations>Plugins. Make sure that your Plugins folder is in the list.
Open font to your desktop and minimize
Method for Tag/Stat Header:
Step 1:
Open TGIFJumpGirlAndDog. Shift D to duplicate image and close original.
Step 1:
Open TGIFJumpGirlAndDog. Shift D to duplicate image and close original.
Using Dropper Tool, set green, HTML #33ef86 for FG color. Set blue, HTML #3e77db for BG color.
Step 2:
Layers>New Raster layer: Normal, 100, 0, Check Layer is visible, UNcheck Lock transparency, and UNcheck Highlight in layer palette
Layers>New Raster layer: Normal, 100, 0, Check Layer is visible, UNcheck Lock transparency, and UNcheck Highlight in layer palette
Flood Fill with BG color
Layers>Arrange>Send to Bottom
Step 3:
In Layers Palette, highlight Raster 1 (girl and dog image)
In Layers Palette, highlight Raster 1 (girl and dog image)
Effects>3D Effects>Drop Shadow: 6, 6, 60, 9, Black, UNcheck Shadow on new layer
OK
Step 4:
In Layers Palette, highlight Raster 2 (blue BG)
In Layers Palette, highlight Raster 2 (blue BG)
Step 5:
Image>Add Borders: Pixels, 1, Check Symmetric, Black
Image>Add Borders: Pixels, 1, Check Symmetric, Black
Image>Add Borders: change size to 7 and color to FG
Image>Add Borders: change size to 17 and color to BG
Selections>Select all
Selections>Modify>Contract 24
Selections>Invert
Effects>Plugins>Penta: change to Dot and Cross, 72, 10, 2
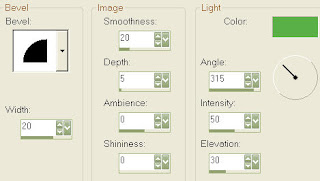
Effects>3D Effects>Inner Bevel: 2, 20, 20, 5, 0, 0, white, 315, 50, 30
Selections>Select none
Step 6:
Image>Add Borders: change size to 27 and FG color
Image>Add Borders: change size to 27 and FG color
Click in new border using Magic Wand Tool: Add, RGB, Tolerance 0, UNcheck Sample Merged, Check Contiguous, Feather 0, Check Anti-alias, Outside
Effects>Artistic Effects>Enamel: 85, 81, 124, 265, FG color
Effects>3D Effects>Inner Bevel
Selections>Select None
Image>Add Borders: change size to 1 and color to Black
Step 7:
Change FG color to red, HTML #ff0000, and BG color to white, HTML #fffff
Change FG color to red, HTML #ff0000, and BG color to white, HTML #fffff
Click Text Tool: Vector, 2Peas Class Act, Size 26, Stroke 1, Bold, Centered, Smooth, Leading 0, Check Auto kern, Kerning 135, Tracking 0, Line style Solid line, Miter limit 1, UNcheck Warp test, Offset 0
In Caps, type each letter of text individually on a separate line
Apply
Use nodes to stretch text between girl and dog to fit as desired.
Objects>Align>Vert. Center in Canvas
Layers>Convert to Raster Layer
Effects>3D Effects>Inner Bevel
Effects>3D Effects>Drop Shadow
Step 8:
Open AB-12-15-04-Starcluster.
Open AB-12-15-04-Starcluster.
Repeat this step to Edit>Copy, then Edit>Paste as a New Layer on working copy, as desired, to have different colored stars (see my sample)
Close original.
Use Mover Tool to place stars in blank areas, as desired.
Individually highlight your star layers and Effects>3D Effect>Drop Shadow each one
Turn on all layers
Merge>Merge all (flatten)
Step 9:
Open !LJ[Flower Accents1]
Open !LJ[Flower Accents1]
Using Freehand Selection Tool (lasso), circle desired accent with connecting circle
Edit>Copy
Close original and mark “No” to question to save changes
Back to working image: Edit>Paste>Paste as New Layer
Back to working image: Edit>Paste>Paste as New Layer
Use Mover Tool to position to left upper corner (see my sample)
Effects>3D Effects>Drop Shadow
Layers>Duplicate
Image>Mirror
Layers>Duplicate
Image>Flip
Layers>Duplicate
Image>Mirror
Image>Mirror
Layers>Duplicate
Image>Flip
Layers>Duplicate
Image>Mirror
Step 10:
Layers>New Raster Layer
Layers>New Raster Layer
Add your watermark
Layers>Merge>Merge All (flatten)
Step 11:
Image>Resize: Pixels, H500, W will self-adjust, Check Resample using Pixel Resize, Check Lock aspect ratio, and Check Resize all layers
File>Export>JPEG Optimizer to save as “your name tag or header”)
**If you want to make a stat, continue with the steps below to create a stat BG. If you want just a tag, you have completed this tut!**
Stat BG:
File>New Image: 200x200 pixels, Raster BG, Transparent
File>New Image: 200x200 pixels, Raster BG, Transparent
Flood Fill with original blue, HTML #3e77db BG color
Effects>Plugins>Penta: jeans
Effects>Image Effects>Seamless Tile: default (check curved arrow by Presets)
File>Export>JPEG Optimizer and save as “your name header BG”
Now you can take your Header and BG files to assemble your stat in LC.
This tutorial was written and designed by Debi Z from teaching and tips gained from learning groups and the web. Any resemblance to other tutorials available is coincidental. Please do not place this tut on any web site without my written permission: debzoe@charter.net. You may share this tutorial, but please give me credit in your stat and/or tag and do not claim it as your own. Please share any creations you make from this tut because I would love to see what you have made.
This tutorial was written and designed by Debi Z from teaching and tips gained from learning groups and the web. Any resemblance to other tutorials available is coincidental. Please do not place this tut on any web site without my written permission: debzoe@charter.net. You may share this tutorial, but please give me credit in your stat and/or tag and do not claim it as your own. Please share any creations you make from this tut because I would love to see what you have made.
I hope you have had fun!
Hugs,
Debi Z
Date Written: January 18, 2010
Link back to my groups required:
http://debizdesigns.blogspot.com/
Hugs,
Debi Z
Date Written: January 18, 2010
Link back to my groups required:
http://debizdesigns.blogspot.com/

and
Graphics: Amys PSP Stuff (link unknown) and Unknown through WWW
Font: 2 Peas Class Act
Font: 2 Peas Class Act
Friday, January 15, 2010
Let the Good Times Roll Stat Tutorial
“Laissez Les Bon Temps Roule!”
Let the Good Times Role Stat Tutorial
Layers>New Raster Layer
Add your Watermark
Layers>Merge>Merge All (Flatten)
Resize to your desired stat header or tag size. I like large, so I left mine at 536W X 536 H.
File>Export using JPEG optimizer and give it a name for you to save it in your folder.
Step 10:
***…And you thought we were through!! If you are making only a tag, you are, but if you are making a stat, continue with this step to create a BG for your stat.
Remember waaaaay back in Step 2, I had you minimize a copy of the image that we were going to use as a stat BG? Well, restore it now.
Layers>Merge>Merge Visible
Image>Resize: 200 x 200 pixels, all layers
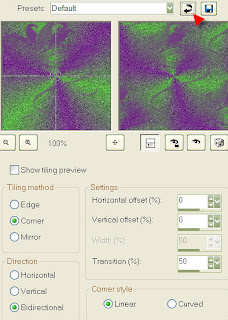
Effects>Image Effects>Seamless Tiling: default settings (click curved arrow by Presets)
Let the Good Times Role Stat Tutorial
Supplies:
Download zip file from http://www.4shared.com/file/193866515/c4fb9ad1/Supplies_for_Laissez_Les_Bon_T.htmlez_Les_Bon_T.htmls_Bon_T.html_Bon_T.htmls_Bon_T.html
Download zip file from http://www.4shared.com/file/193866515/c4fb9ad1/Supplies_for_Laissez_Les_Bon_T.htmlez_Les_Bon_T.htmls_Bon_T.html_Bon_T.htmls_Bon_T.html
PSP 9 was used to create this test, but
any higher versions should work.
Tube: Colors_By_Lory.psp
Tube: cc_Mardi_Gras_Banner_9-03-06.psp
Tube: MardiGrasMask~DebiZ.pspimage
Font: Birthday
Getting Started:
This is an intermediate level tutorial
and assumes you have a working knowledge
of PSP.
All settings remain the same as last used unless otherwise noted.
If a setting is indicated and not available in your version of PSP, it is OK. Your version has allowances for this.
If a setting is indicated and you have more options available, change only those indicated in the lesson.
Open PSP.
Open Tubes.
Choose green with your Dropper Tool from the Mardi Gras Mask tube and set as your FG color. Set your BG color as Purple. A third color, Gold HTML #f0b13f will also be used later in the tut.
Open Font to your desktop and minimize.
See Footer for credits.
**Did you know that Purple, Green, and Gold are the official Mardi Gras colors? If you would like to read a bit on Mardi Gras traditions, check out http://www.novareinna.com/festive/mardi.html I just happened across this site, but it is very informative and fun.
Method for Stat Header:
Step 1:
File>New image: 400, 400, 300, Raster, Transparent
Step 1:
File>New image: 400, 400, 300, Raster, Transparent
OK.
In Material Palette, change FG from color to FG/BG gradient: 45, 5, invert, radial, 50, 50
In Material Palette, change FG from color to FG/BG gradient: 45, 5, invert, radial, 50, 50
OK.
Step 2:
Restore Mardi Gras Mask~DPZ.pspimage.
Shift D to duplicate image.
Close original.
In Layers Palette, delete Watermark layer.
Back to working copy: Layers>New Raster Layer
Flood Fill with BG color.
Layers>New Mask Layer: Image of Mardi Gras Mask, Source luminance checked, Invert mask data UNchecked
OK.
Layers>Merge>Merge Group
Image>Mirror
Shift D to duplicate image. Minimize copy for now. We will use it later to create stat BG pattern.
Step 3:
Restore Colors_By_Lory (lady image).
In Layers Palette, highlight Raster 1.
Edit>Copy
Close original
Back to working copy: Edit>Paste As New Layer
Image>Resize : 68 Percent, check Resample Using Pixel Resize, check Lock aspect ratio, and UNcheck Resize all layers
OK.
Use Mover Tool to reposition to right side.
Effects>Artistic Effects>Enamel: 85, 81, 124, 265, Gold HTML #f0b13
Use Mover Tool to reposition to right side.
Effects>Artistic Effects>Enamel: 85, 81, 124, 265, Gold HTML #f0b13
OK.
Step 4:
Edit>Paste>Paste as new layer (the girl should still be on your clipboard. If not, just recopy and paste)
Image>Resize>OK.
Image>Mirror
Mover Tool to position on left side
Effects>3D Effects>Drop Shadow: 4, 4, 60, 7, Black, Uncheck Shadow on new layer
Step 4:
Edit>Paste>Paste as new layer (the girl should still be on your clipboard. If not, just recopy and paste)
Image>Resize>OK.
Image>Mirror
Mover Tool to position on left side
Effects>3D Effects>Drop Shadow: 4, 4, 60, 7, Black, Uncheck Shadow on new layer
OK.
Step 5:
Image>Add Borders: Pixels, 1, Symmetric, Black (Click Ok if Auto Actions to flatten into a single background layer, if it comes up)
Image>Add Borders: Pixels, 1, Symmetric, Black (Click Ok if Auto Actions to flatten into a single background layer, if it comes up)
OK.
Selections>Select All
Selections>Float
Effects>3D Effects>Cutout: 0, 0, 50, 60, FG, and UNcheck Fill interior with color
Selections>Select All
Selections>Float
Effects>3D Effects>Cutout: 0, 0, 50, 60, FG, and UNcheck Fill interior with color
OK.
Selections>Select None
Step 6:
Image>Add Borders: change size to 20 and color to Gold HTML#f0b13f
Magic Wand in border: Mode: Add (Shift), Match mode: RGB Value, Tolerance 0, UNcheck Sample merged, Check Contiguous, Feather 0, Check Anti-alias, Outside
Selections>Select None
Step 6:
Image>Add Borders: change size to 20 and color to Gold HTML#f0b13f
Magic Wand in border: Mode: Add (Shift), Match mode: RGB Value, Tolerance 0, UNcheck Sample merged, Check Contiguous, Feather 0, Check Anti-alias, Outside

Effects>3D Effects>Inner Bevel: 2, 20, 20, 5, 0, 0, FG color, 315, 50, 30

OK.
Select none.
Select none.
Image>Add Borders : change size to 1, Black color
Image>Add Borders: change size to 45, BG color
Magic Wand in large outside border.
Change FG gradient to Pattern.
Choose transparent BG Mask pattern – angle 0, scale 120
Image>Add Borders: change size to 45, BG color
Magic Wand in large outside border.
Change FG gradient to Pattern.
Choose transparent BG Mask pattern – angle 0, scale 120
OK.
Effects>3D Effects>Inner Bevel: change color to Gold
Selections>Select None
Image>Add Borders: change size to 1, color to Purple
Step 7:
Restore cc_Mardi_Gras_Banner_9-03-06.psp
In Layers Palette, highlight Layer 1.
Edit>Copy
Close original.
To girl image: Edit>Paste as new layer
Image>Resize 90%
Mover Tool to reposition to bottom (see my example for placement)
Effects>3D Effects>Drop Shadow
Step 8:
Layers>New Raster Layer
Change FG from Pattern to Color
Text Tool: Vector, Birthday, 14, Stroke 1, Bold, Centered, Smooth, Check Auto kern, Kerning 135, Line Style Solid
Type “Happy Mardi Gras” and apply.
Layers>Convert to raster layer
Layers>Duplicate 3 times to make text darker.
In Layers Palette, turn off Raster 1 and Background
Layers>Merge>Merge Visible
Effects>3D Effects>Inner Bevel
Effects>3D Effects>Drop Shadow
Turn on all layers.
Mover Tool to position text on banner
Step 9:
Text Tool and type text in 3 lines by typing “Laissez Les” and apply
Text Tool and type 2nd line with “Bon Temps” and apply
Text Tool and type 3rd line with “Roule!” and apply.
Convert to Raster Layer
Layers>Duplicate X 3
In Layer Palette, turn off Background, Raster 1, and Merged layers
Layers>Merge>Merge Visible
Effects> 3D Effects> Inner Bevel: change to BG color
Effects>3D Effects> Drop Shadow
Turn on all layers.
Image>Rotate>Free Rotate: right, 30
Mover Tool to position text as desired
Layers>New Raster Layer
Add your Watermark
Layers>Merge>Merge All (Flatten)
Resize to your desired stat header or tag size. I like large, so I left mine at 536W X 536 H.
File>Export using JPEG optimizer and give it a name for you to save it in your folder.
Step 10:
***…And you thought we were through!! If you are making only a tag, you are, but if you are making a stat, continue with this step to create a BG for your stat.
Remember waaaaay back in Step 2, I had you minimize a copy of the image that we were going to use as a stat BG? Well, restore it now.
Layers>Merge>Merge Visible
Image>Resize: 200 x 200 pixels, all layers
Effects>Image Effects>Seamless Tiling: default settings (click curved arrow by Presets)

OK.
In Layers Palette, decrease opacity to 50.
File>Export>JPEG Optimizer and give name as your file name stat BG.
Now you can take your saved Header and Stat BG to use in Letter Creator to assemble your stationery.
That’s it! I hope you enjoyed my tut and I also hope that you do, indeed, “Let the Good Times Roll”.
This tutorial was written and designed by Debi Z from teaching and tips gained from learning groups and the web. Any resemblance to other tutorials available is coincidental. Please do not place this tut on any web site without my written permission: debzoe@charter.net. You may share this tutorial, but please do not claim it as your own and give me credit in your stat and/or tag. Please send any creations made from this tut to me because I would love to see your creation.
Hugs,
Debi Z
Date Written: 01/10/10
Link back to http://debizdesigns.blogspot.com/ required

Graphics:
Colors_By_Lory - Tubed by Lory
cc_Mardi_Gras_Banner_9-03-06 – Tubed by Cali a.k.a. Delleena 2006 (no website available)
Mardi Gras Mask~DPZ tubed by Debi Z Designs
Colors_By_Lory - Tubed by Lory
cc_Mardi_Gras_Banner_9-03-06 – Tubed by Cali a.k.a. Delleena 2006 (no website available)
Mardi Gras Mask~DPZ tubed by Debi Z Designs
Wednesday, January 13, 2010
Monkeyflies Tag
Love is Kind Tag
Monday, January 11, 2010
Simple Beginner's Tag Tutorial
SIMPLE BEGINNER'S TAG
 **You might have to play around with the size to find the exact one you like. Just Edit>Undo Resize to go back until you find the width & height you like.**
Supplies:
Download zip file from http://www.4shared.com/file/192910189/e1e69eb2/Supplies-Simple_Beginners_TAG.htmlSimple_Beginners_TAG.html
PSP (ver. 9 was used to create this test, but any will work)
Tube: ivy_teddylove.psp
Corner: wl_redcornerhear.pspimage
Pattern: MusicalDreams_CS7.JPG
Font: Birthday
Getting Started:
How to make your first Valentine header/tag.
All settings remain the same as last used unless otherwise noted.
If a setting is indicated and not available in your version of
PSP, it is OK, your version has allowances for this.
If a setting is indicated and you have more options available,
change only those indicated in the lesson.
Open PSP
Open Tubes. Minimize all but ivy_teddylove.psp.
Open Font to your desktop and minimize
Choose light color from tube and left click using Dropper Tool to set Foreground (FG) Color (I chose yellow from the bear)
Choose darker color from tube and right click using Dropper Tool to set Background (BG) Color (I chose brown from the bear)
See Footer for credits. Corners, Pattern, and Font were snagged in sharing groups and/or found on the Internet.
Method:
Step 1:
Using Bear image, Shift D to copy original. It will be named Image 1 now.
Close original.
Our working image will be this copy. Always start with a copy of all your originals. If you make a bad mistake, you can always start over with another copy without damaging the original image.
Delete WM (watermark) layer by highlighting Layer 2 in Layers Palette and clicking the delete button (looks like paper with a red X). Click yes, you are sure you want to delete this layer.
Step 2:
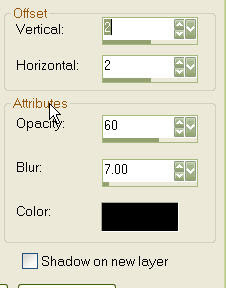
Effects>3D Effects>Drop Shadow with settings of 2, 2, 60 ,7, Black, Shadow on new layer UNchecked

Step 3:
Restore MusicalDreams.
Edit>Copy
Close original
On Bear Image, Edit>Paste>Paste as a new layer
Layers>Arrange>Send to bottom
Restore MusicalDreams.
Edit>Copy
Close original
On Bear Image, Edit>Paste>Paste as a new layer
Layers>Arrange>Send to bottom
**Look at what you did! You have a tube with a background - way to go! Let's add some more to this project!**
Step 4:
Image>Add Borders (click OK to flatten into a single BG layer) with settings Pixels, check Symmetric, 1, Black, UNcheck Shadow on new layer
Image>Add Borders (click OK to flatten into a single BG layer) with settings Pixels, check Symmetric, 1, Black, UNcheck Shadow on new layer
Image>Add Borders, but change size to 5 and use your light FG color
Image>Add Borders, and change size to 15 and use your dark BG color
Step 5:
Selections>Select All (you will see "marching ants" around your border)
Selections>Modify>Contract 20
Selections>Invert ("marching ants" will be around both FG & BG borders)
Effects>3D Effects>Inner Bevel with settings of #2, 20,20, 5, 0, 0, White, 315, 50, 30
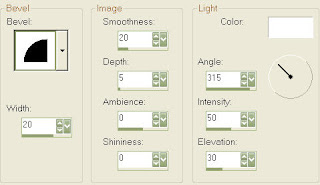
Click OK
Select none
Image>Add Borders, and change size to 15 and use your dark BG color
Step 5:
Selections>Select All (you will see "marching ants" around your border)
Selections>Modify>Contract 20
Selections>Invert ("marching ants" will be around both FG & BG borders)
Effects>3D Effects>Inner Bevel with settings of #2, 20,20, 5, 0, 0, White, 315, 50, 30

Click OK
Select none
Step 6:
Restore Redcornerheart.
Edit>Copy
Close original
Back to Image 1 Bears - Edit>Paste>Paste as new layer
Restore Redcornerheart.
Edit>Copy
Close original
Back to Image 1 Bears - Edit>Paste>Paste as new layer
***Don't panic! It is supersized now, but we are fixing to change it**
Step 7:
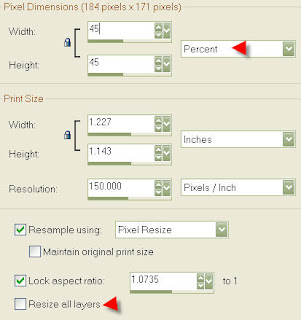
Image>Resize with settings of 45, Percent, and UNcheck Resize all layers
Image>Resize with settings of 45, Percent, and UNcheck Resize all layers
 **You might have to play around with the size to find the exact one you like. Just Edit>Undo Resize to go back until you find the width & height you like.**
Use Mover Tool to position in lower left hand corner (see my sample above for placement)
Effects>3D Effect>Drop Shadow
Step 8:
Layers>Duplicate
Image>Mirror
Layers>Duplicate
Image>Flip
Layers>Duplicate
Image>Mirror
Layers>Merge>Merge All (Flatten)
Step 9:
Use Text Tool (looks like A) with settings of Vector, Birthday, 24, 3, Bold, Centered, Smooth, Auto Kern, Kerning 10, Tracking 0, Line Style solid, Meter limit 1
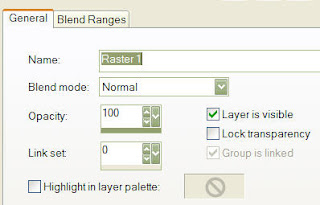
Change both FG color to red & BG colors to white.
Layers>New Raster Layer
Layers>New Raster Layer

Type desired text in box and click apply.
Effects>3D Effects>Inner Bevel
Effects>3D Effects>Drop Shadow
Image>Rotate>Free Rotate, left 30. Use mover tool to position exactly
where you want your text to appear.
Layers>Merge>Merge All (Flatten)
Step 10:
Layers>New Raster layer
Apply your watermark
Layers>Merge>Merge All (Flatten)
Resize to desired size for use as a tag with desired text or as a header image for a stat to assemble in LC (Letter Creator)
File>Export>JPEG Optimizer and give it a name to save
I hope you had fun!
This tutorial was written and designed by Debi Z from teaching and tips gained from learning groups and the web. Any resemblance to other tutorials available is coincidental. Please do not place it on any web site without my written permission: debzoe@charter.net You may share this tutorial, but please do not claim it as your own. Please send any creations made from this tutorial to me because I would love to see your creation using my tutorial.
Hugs,
Debi Z
Date Written: 01/09/10
Link back to http://debizdesigns.blogspot.com/ is required.
Tubed by: Creations by Ivy ivysgraphics.topcities.com
Subscribe to:
Posts (Atom)
