

Supplies:
Download zip file from http://www.4shared.com/file/192910189/e1e69eb2/Supplies-Simple_Beginners_TAG.htmlSimple_Beginners_TAG.html
PSP (ver. 9 was used to create this test, but any will work)
Tube: ivy_teddylove.psp
Corner: wl_redcornerhear.pspimage
Pattern: MusicalDreams_CS7.JPG
Font: Birthday
Getting Started:
How to make your first Valentine header/tag.
All settings remain the same as last used unless otherwise noted.
If a setting is indicated and not available in your version of
PSP, it is OK, your version has allowances for this.
If a setting is indicated and you have more options available,
change only those indicated in the lesson.
Open PSP
Open Tubes. Minimize all but ivy_teddylove.psp.
Open Font to your desktop and minimize
Choose light color from tube and left click using Dropper Tool to set Foreground (FG) Color (I chose yellow from the bear)
Choose darker color from tube and right click using Dropper Tool to set Background (BG) Color (I chose brown from the bear)
See Footer for credits. Corners, Pattern, and Font were snagged in sharing groups and/or found on the Internet.
Method:
Step 1:
Using Bear image, Shift D to copy original. It will be named Image 1 now.
Close original.
Our working image will be this copy. Always start with a copy of all your originals. If you make a bad mistake, you can always start over with another copy without damaging the original image.
Delete WM (watermark) layer by highlighting Layer 2 in Layers Palette and clicking the delete button (looks like paper with a red X). Click yes, you are sure you want to delete this layer.
Step 2:
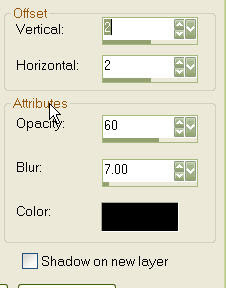
Effects>3D Effects>Drop Shadow with settings of 2, 2, 60 ,7, Black, Shadow on new layer UNchecked
Download zip file from http://www.4shared.com/file/192910189/e1e69eb2/Supplies-Simple_Beginners_TAG.htmlSimple_Beginners_TAG.html
PSP (ver. 9 was used to create this test, but any will work)
Tube: ivy_teddylove.psp
Corner: wl_redcornerhear.pspimage
Pattern: MusicalDreams_CS7.JPG
Font: Birthday
Getting Started:
How to make your first Valentine header/tag.
All settings remain the same as last used unless otherwise noted.
If a setting is indicated and not available in your version of
PSP, it is OK, your version has allowances for this.
If a setting is indicated and you have more options available,
change only those indicated in the lesson.
Open PSP
Open Tubes. Minimize all but ivy_teddylove.psp.
Open Font to your desktop and minimize
Choose light color from tube and left click using Dropper Tool to set Foreground (FG) Color (I chose yellow from the bear)
Choose darker color from tube and right click using Dropper Tool to set Background (BG) Color (I chose brown from the bear)
See Footer for credits. Corners, Pattern, and Font were snagged in sharing groups and/or found on the Internet.
Method:
Step 1:
Using Bear image, Shift D to copy original. It will be named Image 1 now.
Close original.
Our working image will be this copy. Always start with a copy of all your originals. If you make a bad mistake, you can always start over with another copy without damaging the original image.
Delete WM (watermark) layer by highlighting Layer 2 in Layers Palette and clicking the delete button (looks like paper with a red X). Click yes, you are sure you want to delete this layer.
Step 2:
Effects>3D Effects>Drop Shadow with settings of 2, 2, 60 ,7, Black, Shadow on new layer UNchecked

Step 3:
Restore MusicalDreams.
Edit>Copy
Close original
On Bear Image, Edit>Paste>Paste as a new layer
Layers>Arrange>Send to bottom
Restore MusicalDreams.
Edit>Copy
Close original
On Bear Image, Edit>Paste>Paste as a new layer
Layers>Arrange>Send to bottom
**Look at what you did! You have a tube with a background - way to go! Let's add some more to this project!**
Step 4:
Image>Add Borders (click OK to flatten into a single BG layer) with settings Pixels, check Symmetric, 1, Black, UNcheck Shadow on new layer
Image>Add Borders (click OK to flatten into a single BG layer) with settings Pixels, check Symmetric, 1, Black, UNcheck Shadow on new layer

Image>Add Borders, but change size to 5 and use your light FG color
Image>Add Borders, and change size to 15 and use your dark BG color
Step 5:
Selections>Select All (you will see "marching ants" around your border)
Selections>Modify>Contract 20
Selections>Invert ("marching ants" will be around both FG & BG borders)
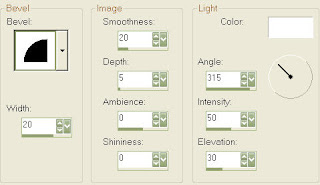
Effects>3D Effects>Inner Bevel with settings of #2, 20,20, 5, 0, 0, White, 315, 50, 30
Click OK
Select none
Image>Add Borders, and change size to 15 and use your dark BG color
Step 5:
Selections>Select All (you will see "marching ants" around your border)
Selections>Modify>Contract 20
Selections>Invert ("marching ants" will be around both FG & BG borders)
Effects>3D Effects>Inner Bevel with settings of #2, 20,20, 5, 0, 0, White, 315, 50, 30

Click OK
Select none
Step 6:
Restore Redcornerheart.
Edit>Copy
Close original
Back to Image 1 Bears - Edit>Paste>Paste as new layer
Restore Redcornerheart.
Edit>Copy
Close original
Back to Image 1 Bears - Edit>Paste>Paste as new layer
***Don't panic! It is supersized now, but we are fixing to change it**
Step 7:
Image>Resize with settings of 45, Percent, and UNcheck Resize all layers
Image>Resize with settings of 45, Percent, and UNcheck Resize all layers
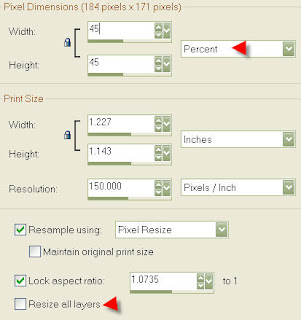 **You might have to play around with the size to find the exact one you like. Just Edit>Undo Resize to go back until you find the width & height you like.**
Use Mover Tool to position in lower left hand corner (see my sample above for placement)
Effects>3D Effect>Drop Shadow
Step 8:
Layers>Duplicate
Image>Mirror
Layers>Duplicate
Image>Flip
Layers>Duplicate
Image>Mirror
Layers>Merge>Merge All (Flatten)
Step 9:
Use Text Tool (looks like A) with settings of Vector, Birthday, 24, 3, Bold, Centered, Smooth, Auto Kern, Kerning 10, Tracking 0, Line Style solid, Meter limit 1

Change both FG color to red & BG colors to white.
Layers>New Raster Layer
Layers>New Raster Layer

Type desired text in box and click apply.
Effects>3D Effects>Inner Bevel
Effects>3D Effects>Drop Shadow
Image>Rotate>Free Rotate, left 30. Use mover tool to position exactly
where you want your text to appear.
Layers>Merge>Merge All (Flatten)
Step 10:
Layers>New Raster layer
Apply your watermark
Layers>Merge>Merge All (Flatten)
Resize to desired size for use as a tag with desired text or as a header image for a stat to assemble in LC (Letter Creator)
File>Export>JPEG Optimizer and give it a name to save
I hope you had fun!
This tutorial was written and designed by Debi Z from teaching and tips gained from learning groups and the web. Any resemblance to other tutorials available is coincidental. Please do not place it on any web site without my written permission: debzoe@charter.net You may share this tutorial, but please do not claim it as your own. Please send any creations made from this tutorial to me because I would love to see your creation using my tutorial.
Hugs,
Debi Z
Date Written: 01/09/10
Link back to http://debizdesigns.blogspot.com/ is required.
Tubed by: Creations by Ivy ivysgraphics.topcities.com

No comments:
Post a Comment