
Supplies:
Download and unzip supplies file from http://www.4shared.com/file/218711733/2ae4acfe/Big_Woman_Tutorial_Supplies.html
Included in this file is:
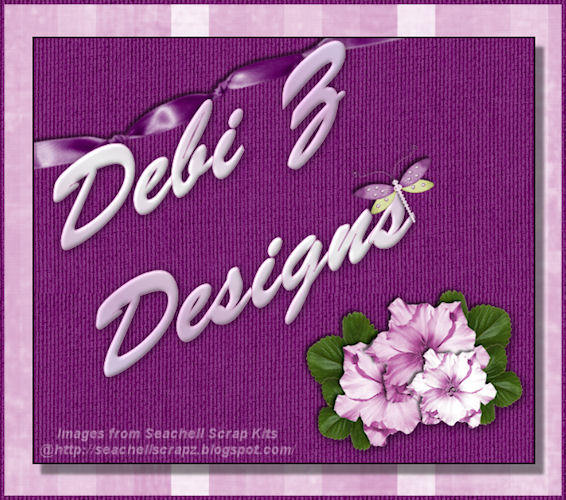
Hearts~DPZ.pspimage http://debizdesigns.blogspot.com
CupidGarfield-TubedByDanetta[1-20-06].psp; website unavailable
CherSwitz~Découpage-027~Sourinelle~Scan~.psp; website unavailable
Pleasantly Plump.ttf
Love Light.ttf
LS Heart Throb.ttf
Silk.ppimage
Getting Started:
This is an intermediate level tutorial and assumes you have a working knowledge of PSP.
All settings remain the same as last used unless otherwise stated.
If a setting is indicated and not available in your version of PSP, it is OK. Your version has allowances.
If a setting is indicated and you have more options available, change only those indicated in this lesson.
Install Silk into your Textures folder before you open PSP.
Open all three fonts; Love Light, LS Heart Throb, and Pleasantly Plump; and minimize to your desktop.
Method for Tag/Stat Header:
Step 1:
Open PSP, ver. 9 used here, but yours should work well.
Open all 3 graphics in your workspace of PSP. Shift + D to duplicate all 3 images and close originals.
Using Dropper Tool and Hearts image, select #7cbddf for FG and #e4609c for BG.
Minimize the 3 images.
Step 2:
File>New: 500Wx500H pixels, raster, transparent:

OK
This will be our working copy.
**Note: The following may be something you are not used to using, so pay particular attention to settings and to the arrows of where these are to be found.
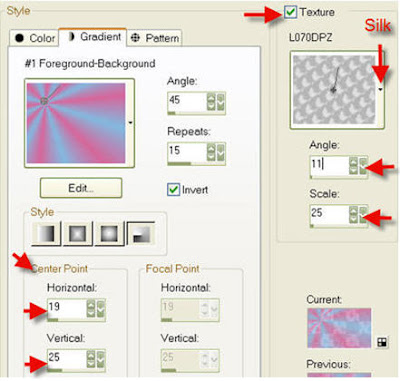
Change FG color to Gradient. Use FG/BG gradient: 45, 15, Invert checked, Radial,Center Point: 19, 25, Texture checked, choose Silk from dropdown list, 11, 25:
OK
Flood Fill working copy with texured gradient.
Step 3:
Using Garfield image: Image>Mirror
Right click header and select to Copy and close original without saving changes
Working copy: Right click header and select Paste as New Layer
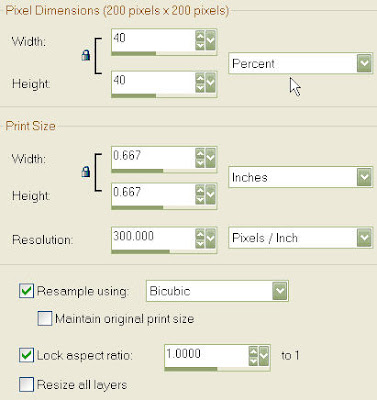
Image>Resize: 40%, Check Resample using Bicubic, Check Lock aspect ratio 1 to 1, and UNcheck Resize all layers:
OK
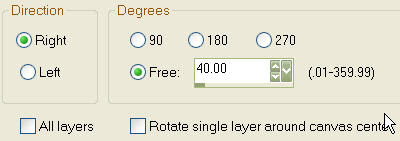
Image>Rotate>Free Rotate: right, free 40, UNcheck All layers and Rotate single layer around canvas center:
OK
Using Mover Tool, move Garfield to Left Upper Corner (see my sample).
Effects>3D Effects>Drop Shadow: 2, 0, 80, 7, Black, UNcheck Shadow on new layer:
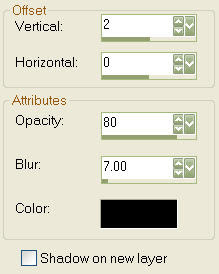
OK
Repeat Drop Shadow, but change Vertical to -2
Step 4:
Using Elephant image: Right click header and select Copy and then close original without saving changes.
Working image: Right click header and select Paste as New Layer
Image>Resize: change size to 80%
Image>Mirror
Using Mover Tool, position elephant and mousie to Right Lower Corner (see sample)
Effects>3D Effects>Drop Shadow: vertical 2
Repeat Drop Shadow: vertical -2
Step 5:
Change FG from Gradient to Color, using Red #ff0000 with NO texture and change BG to Black #000000
Click Text Tool: Create as Vector, Love Light font (mine says only Love), Size 30 pixels, Stroke 1.0, Bold, Centered, Anti-alias: Smooth, Leading 0, Check Auto kern, Kerning: 135, Tracking 0, Line Style Solid, Miter limit 1, UNcheck Warp text, and Offset 0:

Click working copy to bring up Text Entry box and type in “It’s OK” on one line and “to Love a…” on another line:
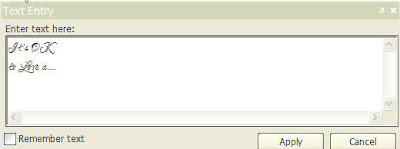
Apply
Use vector nodes to position and/or stretch text to fit Right Upper Corner (see sample)
Layers>Convert to Raster Layer
Effects>3D Effects>Inner Bevel: 2, 10, 20, 2, 0, 0, White, 315, 50, 30:
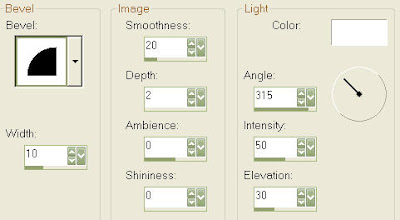
OK
Effects>3D Effects>Drop Shadow: 2V, 0 H, 80 Opacity, 7 Blur, Black Color, UNcheck Shadow on new layer, as done earlier
Change font to Pleasantly Plump and Swap Materials in Materials Palette to make FG black and BG red
Click on working copy to bring up Text Entry box and type in “BIG”
DO NOT APPLY yet
Switch font to LSHeartThrob and on a separate line, type “WOMAN”
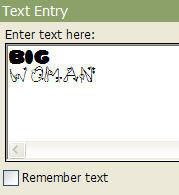
Apply
Use vector nodes to fit within Lower Left Corner (see sample)
Layers>Convert to Raster Layer
Effects>3D Effects>Inner Bevel
Effects>3D Effects>Drop Shadow
Layers>Merge>Merge All (Flatten)
Selections>Select All
Effects>3D Effects>Cutout: 0, 0, 100, 25, Red BG color, UNcheck Fill interior with color:
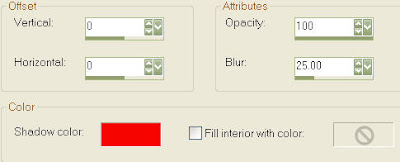
OK
Selections>Select None
Effects>3D Effects>Buttonize: 23, 50, 50, Check Transparent, UNcheck Solid, White
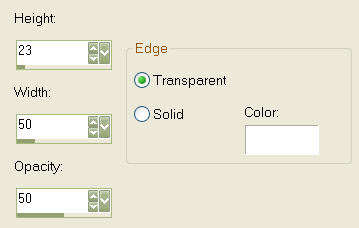
OK
File>Export>JPEG Optimizer to save as “Your Name Header” and minimize.
If you are making only a tag, you have completed the tut. Continue tutorial to make a stat BG.
Step 6:
Using Hearts image: Layers>Duplicate
Image>Flip
Use Mover Tool to position as below:

Layers>Merge>Merge Visible
Effects>Image Effects>Seamless Tile: click curved arrow for default settings:
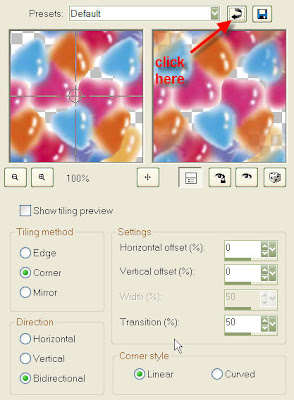
OK
Image>Resize: 200x200 pixels, Check Resample using Bicubic, UNcheck Lock aspect ratio, Check Resize all layers
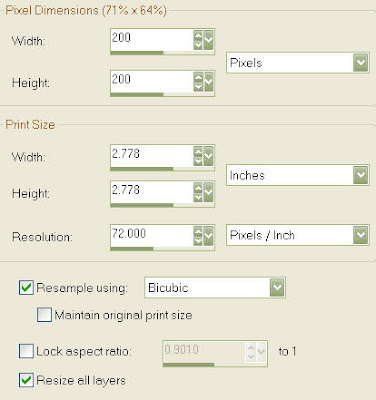
OK
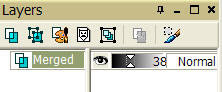
In Layers Palette, decrease opacity to 38:
File>Export>JPEG Optimizer and save as “Your Name BG”
You can now take both your Header and BG files to Letter Creator to assemble your stat.
This tutorial was written and designed by Debi Z from teaching and tips gained from learning groups and the web. Any resemblance to other tutorials available is coincidental. Please do not place this tut on any web site without my written permission: debzoe@charter.net. You may share this tutorial, but please give me credit in your stat and/or tag and do not claim it as your own. I would love to see any creations you make from this tut.
I hope you have had fun!
Hugs,
Debi Z
Date Written: February 4, 2010
Link back to my groups required:
Link back to my groups required:

http://debizdesigns.blogspot.com/


No comments:
Post a Comment