

Supplies:
Download and unzip supplies file from
http://www.4shared.com/file/208184027/11e03ee3/Wolves_RetreatStat_Tut_Suppli.html
Included in this file are:
Xero Plugin
WoodsFenceAugSeriesAutumn3-4.pspimage by MontanaKateMist here
David Stribbling’s new web address copyright tube.pspimage
Wolves1620 by David Stribbling (other ©David Stribbling here or here)
Wet fall leaves.bmp
Getting Started:
This is an intermediate level tutorial and assumes you have a working knowledge of PSP.
All settings remain the same as last used unless otherwise stated.
If a setting is indicated and not available in your version of PSP, it is OK. Your version has allowances.
If a setting is indicated and you have more options available, change only those indicated in this lesson.
Settings are not listed, but shown in the screen shots.
Install the Xero folder into your plugins folder before you open PSP.
Install Wet fall leaves file into your Textures folder before you open PSP.
Open PSP. Version 9 was used for this tutorial, but your version should work.
Set File Preferences for the Xero Plugin.
Step 1:
Open both graphics. Shift D to duplicate images and close originals.
Using Dropper Tool and Fence image, select light color HTML #fea41d for FG color and a darker color HTML #524f19 for BG color.
File>New:
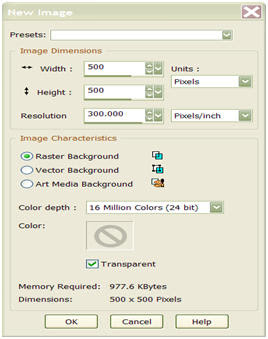
OK
Selections>Select all
Right click Fence image>Copy. Close copied image.
Back to blank, selected, 500x500 image and right click>Paste Into Selection
Selections>Select None
Step 3:
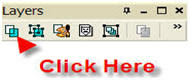
In Layers Palette, click New Raster Layer
Icon
OK
Layers>Arrange>Move Down
Flood Fill with FG color:

Step 4:
Effects>Texture Effects>Texture: BG color

Step 5:
Effects>Plugins>Xero>Porcelain:
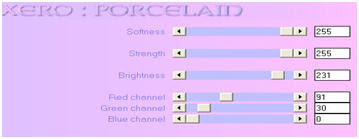
OK
In Layers Palette, decrease opacity to 75
 Step 6:
This step will create the BG to use with the stat. If you want to only create a tag, you can skip to Step 7.
Layers>Merge>Merge All (flatten)
Shift D to duplicate
Image>Resize:
 OK
OK
 OK
OK
Layers>Promote Background Layer
Decrease opacity to 36
File>Export>JPEG optimizer to your folder titled as “Wolves Retreat BG”.
Close for now.
Step 7:
Right click wolves image>Copy. Close copied image.
Back to fence image. Right click>Paste As New Layer
Image>Mirror
Use Mover Tool to position in lower left corner (see sample)
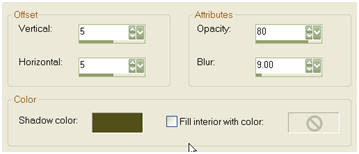
Effects>3D Effects>Drop Shadow:
 OK
OK
Repeat Drop Shadow, but with V at -4 and H at -2.
Layers>Merge>Merge All (flatten)
Step 8:
Selections>Select All
Selections>Float
Effects>3D Effects>Cutout: using BG color
 OK
OKSelections>Select None
Effects>Plugins>Xero>Mistifier
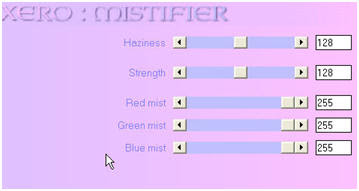 OK
OK Step 10:
Image>Add Borders: using BG color
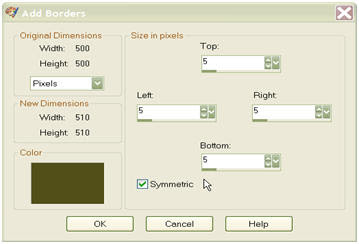 OK
OK Magic Wand border:

Effects>3D Effects>Inner Bevel:
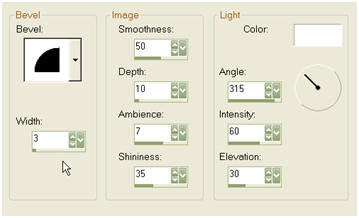
OK
Selections>Select None
Step 11:
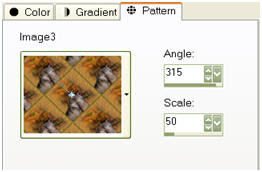
Change FG from color to patterns using wolves image that we have been working on:
Image>Add Borders: change size to 30 and use FG color
Magic Wand this border
Flood Fill with pattern.
Effects>Plugins>Xero>Mistifier
Effects>Artistic Effects>Topograpy: Color is HTML#7090c2

OK
Selections>Select None
Repeat Step 10
Image> Add Borders: Change size to 1 and color to Black
Layers>New Raster Layer
Open David Stribbling’s new web address copyright tube.pspimage. Right click>Copy
Right click>Paste as New Layer on framed wolves image.
Image>Rotate>Free Rotate: right 90 degrees
Use Mover Tool to place on right side (see my sample)
Layers>New Raster Layer
Add Watermark
Layers>Merge>Merge All (flatten)
Image>Resize as desired
File>Export>JPEG Optimizer
Use both files you created to assemble your stat in LC.
This tutorial was written and designed by Debi Z from teaching and tips gained from learning groups and the web. Any resemblance to other tutorials available is coincidental. Please do not place this tut on any web site without my written permission: debzoe@charter.net You may share this tutorial, but please give me credit in your stat and/or tag and do not claim it as your own. Please share any creations you make from this tut with me because I would love to see what you have made!
I hope you have had fun!
Hugs,
Debi Z
Date Written: January 26, 2010
Link back to my groups required:

No comments:
Post a Comment